Modular assembly of the hToC: An adaptable protocol for interfacing a monolayer with a 3D culture
Introduction:
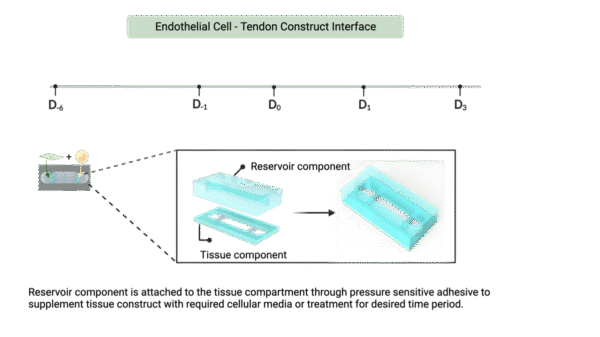
This post presents a comprehensive protocol detailing an in vitro seeding and culturing method tailored for diverse cellular monolayer and tissue interfaces. These interfaces necessitate varying culturing conditions and extended timeframes, facilitated through modular device utilization. The methodology focuses on endothelial cells interfacing a three-dimensional (3D) tissue construct, demarcated by a porous membrane within the human Tendon-on-a-Chip (hToC), mimicking a fibrovascular interface.
The protocol addresses the challenge posed by distinct optimal culturing conditions required for endothelial cells and the tissue construct. It introduces Human Umbilical Vein Endothelial Cells (HUVECs) for the endothelial barrier, alongside human primary monocytes and tenocytes isolated from human blood donors and medical center patients respectively. Monocytes play a dual role, co-cultured within the tissue construct with tenocytes to undergo differentiation, and within the endothelial component to simulate their inflammatory response arrival.
The resulting hToC intricately integrates these cell types to simulate the complex disease environment of chronic fibrovascular adhesions in tendon tissue. This protocol contributes to advancing the study of cellular interactions within intricate tissue interfaces, offering a valuable tool for investigating various physiological and pathological scenarios.
Materials:
- Access to cells
- I used human primary cells for the tenocytes, isolated from tenolysis surgeries. If you are interested in using human Tenocytes, the Awad lab has a healthy stock from which you could run some preliminary experiments. Contact Dr. Awad for this.
- Ensure to use the same patient to minimize variability in experiment.
- Monocytes isolated from human blood PBMC coats
- If you need this protocol I can send it to you, but both Dan, Victor, and Isabelle have experience using this protocol.
- Human Umbilical Vein endothelial cells (HUVECs)
- These were purchased these from LONZA,pooled cells (Cat#C2519A)
- Media
- DMEM + 10%FBS, and 5% FBS for tenocyte culturing in flask
- Note, antibiotics are added to expansion media. This is a personal choice to not expose cells to additional variables. If you have trouble with contamination consider adding 1% penstrep to this media.
- XVIVO10 (LONZA, 04-380Q) used when cells are placed in device
- EGM-2 media (LONZA, CC-3162) for HUVEC expansion
- DMEM + 10%FBS, and 5% FBS for tenocyte culturing in flask
- Added factors
- Monocyte colony stimulating factor (M-CSF) (Sigma-#H6916)
- TGF-b1
- tPA-Activator (novus #NBP2-59553)
- Human Plasminogen (Prolytix #HCPG-0130)
- Biomaterials
- TeleCol-3 (Advanced BioMatrix #5026)
- Human Fibronectin (Sigma, #F1056)
- Tools/Devices
- hToC Bottom Channel
- mSiM top component
- SiMPore 5 mm Dual-Scale Membrane (Or your preferred membrane)
- hToC Reservoirs
- Assembly jigs
- Chip (Membrane) Tweezers
- Flathead tweezers
- I used human primary cells for the tenocytes, isolated from tenolysis surgeries. If you are interested in using human Tenocytes, the Awad lab has a healthy stock from which you could run some preliminary experiments. Contact Dr. Awad for this.
Protocol:
Cell expansion
- Expand tenocytes (TCs) to 106 cells/mL in 10% FBS DMEM
- This will usually consist of one T-75 flasks at ~90% confluency or one T-125 flask at ~80% confluency.
- It is very important to get the appropriate number of cells into the hydrogels otherwise there will not be enough force to visually see contraction in the gel. So, plan accordingly to seed enough cells for how many devices you will need. 1 bottom channel = 100 mL hydrogel cell mixture with 50,000 TCs and 7,200 Mj.
- 14-hrs prior to trypsinizing and seeding, switch to 5% FBS DMEM to ensure cell survival as you switch to serum free XVIVO-10. This is the serum starvation is required to avoid cell shock as they move into a serum-free media.
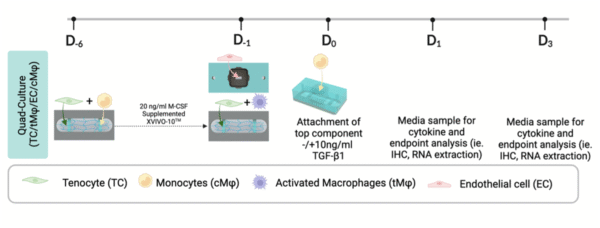
Day of Seeding the devices (D-6)
- Prepare sterile hood for cell work. Expose all the components required (including tweezers, water reservoirs, hToC bottom channel, hToC reservoir, petri dishes) to 15 min of antibacterial UV light in the hood to sterilize them.
- Trypsinize and suspend the cells in the correct amount of media.
- For a t-75 flask I will usually suspend in 1 mL of media
- Seed at 500K cells/mL, so ~ 50,000 cells/device for high contraction
- Seed at 300K cells/mL, so ~ 30,000 cells/device for low contraction
- Prepare the collagen
- TeloCol-3, Advanced Biomatrix Cat#: 5026, including TeleCol-3 neutralization solution
- Always make more than what you need since it is viscous and you will inherently lose some
- Test pH to be 7.2 using a pH strip – Very important as wrong pH will kill cells and prevent hydrogel crosslinking
- TeloCol-3, Advanced Biomatrix Cat#: 5026, including TeleCol-3 neutralization solution
- I use the ratio of 1 part cell suspension to 18 parts collagen mix
- For 1 mL of cell mixture, add ~52 uL of cell suspension containing all of your cells (TCs & MY)
- Mix the cells into the collagen mix, ensuring not to make bubbles.
- You can pipette up and down, or mix in a conical tube and swirl the tube slowly to incorporate the cells evenly.
- Make sure to keep the cell-collagen mix on ice as the hydrogel will start crosslinking immediately and you will not be able to add it to the devices.
- Aliquot 100 µL cell/collagen mix into the hToC bottom Channel and make sure it is spread out evenly in the bottom channel.
- This works best if you introduce the collagen at an angle to the channel.
- Place device in incubator for 15-20 minutes to allow for collagen to crosslink and solidify
- Gels will appear cloudy when they are completely gelled
- Take the channel out of the incubator and score the perpendicular edges of the hydrogel between the two horizontal anchors.
- This will allow the hydrogel to contract freely as the cells start pulling on the matrix
- After scoring, attach the reservoir to the bottom channel using the assembly jig.
- Add 200 µL of media to reservoir
- This is the step that I switch to serum free media, so I stop using the culturing media and instead I add 200 µL of XVIVO-10 media by lonza
- If macrophages are in the hydrogel add M-CSF at a concentration of 20 ng/ml to the XVIVO-10
- Make sure you add a water reservoir into the petri dish with the bottom channel to prevent high levels of evaporation.
- Exchange 100 mL of media each day until D0 (Note, this is ½ media replacement everyday)
Seeding ECs onto top component (D-1)
17. Assemble appropriate membrane into top component using the assembly jig
-
- You can do this at the bench as we will sterilize at the next step
- Trench side down for the membrane (trench opens to bottom channel)
18. Sterilize all tools & devices using bactericidal UV in the cell culture hood for 15 min (Including tweezers)
19. Prepare 1 mL of TeleCol-3 and coat the membrane trench with 15 mL of collagen mix to create an even surface
-
- The reason for this step is to avoid bubbles from being trapped between the trench and the hydrogel which can kill the ECs on the membrane.
- You can use your pipette tip to smoothen out the collagen bubble onto the surface, but be careful not to break the membrane.
20. Place collagen-coated devices into the incubator for 10-15 min to crosslink
-
- Check often as this small amount of collagen can crosslink and evaporate quickly in the incubator.
21. While collagen is crosslinking, add EGM-2 media onto reservoir plates to hold the top component
-
- A reservoir plate is a petri dish with hToC reservoirs attached to create temporary channels that will hydrate the basal side of the EC monolayer prior to attaching the hToC bottom Channel
22. Once crosslinked, remove top components from incubator and place them onto the reservoir plates
23. Prepare human fibronectin mixture at 40 mg/ml and add onto top component well and let sit for 1 hour
24. 15 min prior to fibronectin coating begin to trypsinize ECs and prepare appropriate EC suspension
-
- Suspended @ 40,000 ECs/100 mL
- Suspension in EGM-2 media
25. Remove fibronectin coating from top component well
26. Add 100 mL EC suspension to each well and place in the incubator for 2-hours
27. After 2-hours, replace media to remove unattached cells

Day of assembling top and bottom components (D0)
28. Isolate monocytes from human PBMC coats (refer to monocyte isolation protocol)
29. Prepare all media with factors you will need so it’s ready to go once devices are assembled
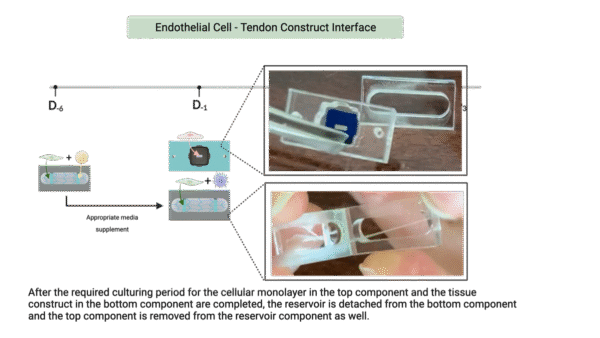
30. Remove media from the bottom channel and using the flathead tweezers separate the reservoir from the bottom channel
-
- Start at the scored edge and lift the bottom channel up slowly to separate
- Careful not to remove adhesive or dislodge the hydrogel from the anchors
- Working with two devices at a time (2 top components & 2 bottom channels) helps prevent the cells from being outside the incubator for extended periods of time.
31. Place the bottom channel (with reservoir removed) adhesive side up on the assembly jig
32. Remove media from the top component well
33. Using a kimwipe, dry the bottom surface of the top component
-
- You want to remove any media on the surface that should adhere to the bottom channel adhesive as wet surfaces do not adhere!
- Careful not to disrupt the membrane
34. Place the dried top component onto the bottom channel in the assembly jig

35. Using flat-head tweezers press on the edges of top component to adhere to the bottom channel.
-
- Do not use an assembly jig component to press and adhere components together as this provides too high of pressure and presses the collagen through the membrane, breaking the membrane. Using the flathead tweezers is enough.
36. Fill the top well with XVIVO-10 media and finish the assembly of all other devices
37. Once all devices are assembled and the monocytes have been appropriately assembled in media (if using monocytes), add 100 mL of -/+ 10 ng/ml TGF-b1 XVIVO-10 media onto the bottom channel, careful to not overflow it onto the top component.
38. Replace top well media with 100 mL of appropriate monocyte suspension
-
- Just XVIVO-10 or with other treatment (ie. IBU or RAPA)
39. Place a water reservoir in each Petri dish to avoid evaporation and place it in the incubator for the experimental period (24 or 72 hours)
40. For 72-hour experiments, top off well with fresh media every 24 hours to prevent complete evaporation of the well
-
- This is usually 20 – 40 mL

Results:
The assembled device can be cultured for an extended time. The hToC protocol cultures the device for 72-hours after assembly. Another option is to culture the top and bottom components separately using the reservoirs for media supplements. This might be necessary for some cultures and/or experiments and should be investigated appropriately.
Desired downstream analysis can then be performed on the cellular supernatant, cells, and the tissue matrix.
If you have questions regarding this protocol or any of the components, please let me know, I would be happy to help.