Running SolidWorks 2025 on an Apple Silicon Mac with VMware Fusion: A Complete Setup Guide
If you’re a researcher or student using SolidWorks on an Apple Silicon Mac, you’ve probably run into the same wall: SolidWorks doesn’t officially support virtualized environments, and getting it to run stably in VMware Fusion takes some work. After extensive troubleshooting, here is the complete step-by-step protocol that got SolidWorks 2025 running on an M5 Pro MacBook Pro using VMware Fusion. Advantage here is unlike other Windows emulators, VMware is fully free.
Environment
- Mac: Apple Silicon (M5 Pro)
- VM Software: VMware Fusion Pro
- Guest OS: Windows 11 ARM (64-bit)
- SolidWorks: 2025 (Student Edition)
Step 0: Download and Install VMware Fusion
VMware Fusion Pro is now free for personal and commercial use. Here’s how to get it:
- Go to support.broadcom.com and create a free Broadcom account.
- Once logged in, navigate to VMware Cloud Foundation → My Downloads.
- Search for VMware Fusion and select the latest version of VMware Fusion Pro.
- Download the
.dmginstaller and run it on your Mac. - When prompted for a license key, choose Use VMware Fusion for Personal Use — no key required.
- Create a new virtual machine and install Windows 11 ARM (download the ARM ISO from Microsoft’s website).
- Allocate at least 4 CPU cores (change as you see fit) and 8 GB RAM (change as you see fit) to the VM for SolidWorks.
- Install VMware Tools inside Windows after setup — this is critical for graphics driver support.
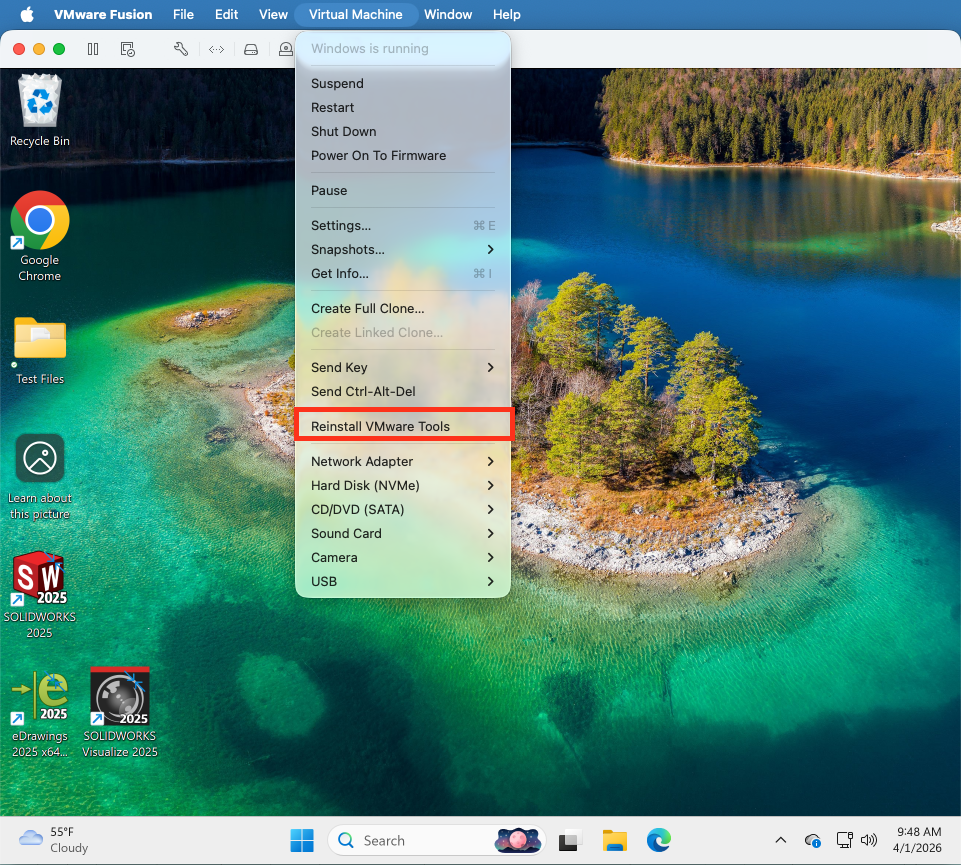
Figure 1: Installing VMware Tools.
Part 1: Disable Vulkan Runtime Libraries (Inside Windows VM)
The root cause of SolidWorks freezing when entering sketch mode is a conflict between Windows’ Vulkan runtime libraries and VMware’s virtual SVGA3D graphics driver. The fix is to prevent Vulkan from loading.
Step 1 — Open File Explorer as Administrator
- Right-click File Explorer in the taskbar and select Run as administrator.
Step 2 — Rename Vulkan files in System32
- Navigate to
C:WindowsSystem32 - In the search box, type:
vulkan - Rename the following files by adding
.bakto the end of each filename:
vulkan-1.dll      →  vulkan-1.dll.bak
vulkaninfo.exe → vulkaninfo.exe.bak- Also rename any other files beginning with
vulkanorVkLayer.
Step 3 — Repeat in SysWOW64
- Navigate to
C:WindowsSysWOW64 - Search for
vulkanand rename any files found the same way.
⚠ Important: Do not rename files inside
C:WindowsWinSxS— this is the Windows component store and must not be modified.
Part 2: Add VMware GPU to the SolidWorks Allowlist (Registry)
SolidWorks maintains an internal whitelist of recognized graphics adapters. VMware’s SVGA3D adapter is not on this list, which is why “Use Software OpenGL” is permanently grayed out. These registry edits force SolidWorks to recognize and accept the virtual GPU.
Step 4 — Open Registry Editor
- Press Win + R, type
regedit, press Enter. - Accept the UAC prompt if shown.
Step 5 — Update the Workarounds value under VMware, Inc.
- Navigate to:
HKEY_CURRENT_USERSoftwareSolidWorksAllowListVMware, Inc.- Double-click the Workarounds DWORD value.
- Select Hexadecimal and set the value to:
4000480 - Click OK.
Step 6 — Create the GL2Shaders renderer key
- Navigate to:
HKEY_CURRENT_USERSoftwareSolidWorksAllowListGL2ShadersOther- Right-click Other → New → Key
- Name the new key exactly:
SVGA3D; build: RELEASE; LLVM; - Click into the new key.
- Right-click in the right panel → New → DWORD (32-bit) Value
- Name it:
Workarounds - Double-click → select Hexadecimal → set value to:
4000480 - Click OK.
Step 7 — Update the Workarounds value in AllowListCurrent
- Navigate to:
HKEY_CURRENT_USERSoftwareSolidWorksAllowListCurrent- Confirm that Renderer shows:
SVGA3D; build: RELEASE; LLVM; - Confirm that Vendor shows:
VMware, Inc. - Double-click the Workarounds DWORD value.
- Select Hexadecimal → set value to:
4000480 - Click OK, then close Registry Editor.
Part 3: Launch and Verify SolidWorks
Step 8 — Launch SolidWorks
- Open SolidWorks 2025.
- Do not open any part or document yet.
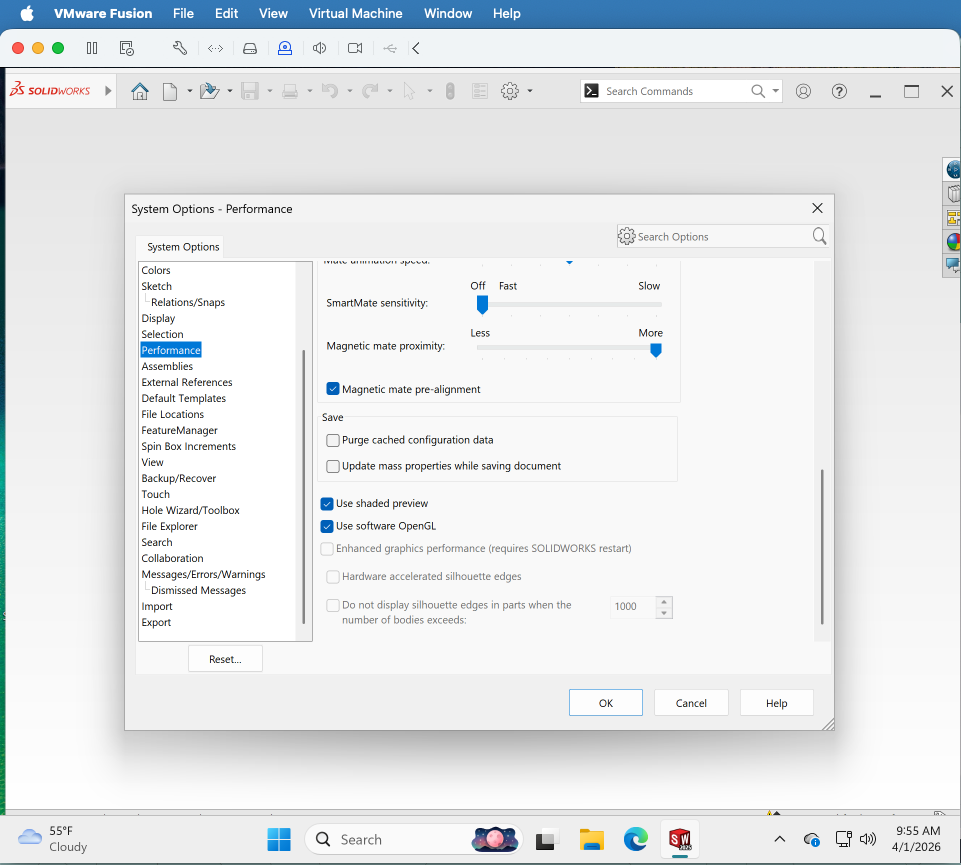
Step 9 — Check Performance Settings
- Go to Tools → Options → System Options → Performance
- Confirm “Use Software OpenGL” is unchecked (it may still appear grayed but unchecked — this is acceptable).
- Uncheck Use shaded preview to reduce GPU load.
- Click OK.
Step 10 — Disable Heavy Visual Effects
In the View menu, turn off the following if enabled:
- RealView Graphics
- Shadows In Shaded Mode
- Ambient Occlusion
- Perspective
Important Notes
- These settings survive VM reboots but may need to be re-applied if SolidWorks is reinstalled or updated.
- The Workarounds registry values may occasionally be reset by SolidWorks. If sketch freezes return, check that all three values are still set to
4000480(hex). - To undo all changes: rename the
.bakVulkan files back to their original names and delete the registry keys created in Steps 5–7. - VMware Fusion’s virtual SVGA3D adapter is not a certified SolidWorks GPU. This protocol provides a functional workaround for light modeling and sketching. Complex assemblies and simulations may still experience some slowness due to the x86 emulation layer running on ARM hardware.
Protocol developed through troubleshooting — April 2026. Tested on MacBook Pro M5 Pro with VMware Fusion Pro and SolidWorks 2025 Student Edition.