Fabrication the Nano-pocket membrane (update)
The fabrication of nano pocket membrane to capture and release the EV faced challenges during the etching step. There was a suggestion after the last NRG post to use RIE-2000 located in the UR. This post shows the update on the methodology of creating the nano pocket membranes and the preliminary results after using the new machine.
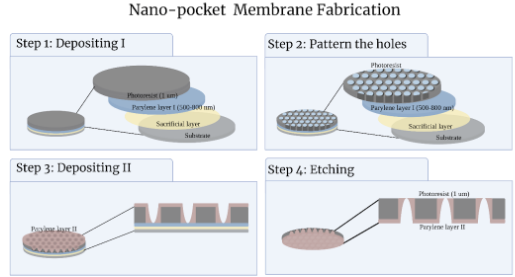
Figure 1: An overview scheme of the fabrication process
Membrane Fabrication :
Figure 1 provides an overview of the fabrication process. The fabrication process is divided into 4 steps: depositing I, porous pattern, depositing II, and etching. The first process is creating the layers by depositing them over the Si wafer. We started by depositing a Sacrificial Layer (SL) to peel off the membrane in the further steps. Then a Parylene layer (PAR), named Parylene I in the figure, is deposited to protect the SL layer from the next layer which is the Photoresist (PR) layer. Finally, a layer of 1 um PR is deposited over PAR layer I. To validate the parylene deposition, a NanoSpec Spectrophotometer is used to measure the PAR thickness. The final nano-pocket membranes shape should has a wide opening (700-1000 nm) on top that narrowed down to a smaller opening on the bottom side (150 to 300 nm) (figure 2).
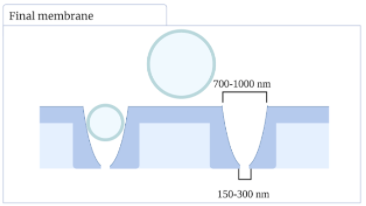
Figure 2: scheme of the final membrane shape
Results:
The result to produce the nano-pocket is:
1- the PR is 0.7 um pores and the thickness 1 um
2- the amount of PAR in top of the 0.5 gr ~ 800 nm
3- the amount of the PAR under the PR is 800 nm
The previous challenges we faced on the last step is the etching step. The etching machines used were Trion Phantom III RIE and plasma chamber at RIT. We faced multiple issues to have the nano-pocket because of the inconsistent results and variety etching time. We used the RIE-2000 at the UR. The parameters used in the etching were 100 w and 30 sccm the O2. The etching rate is between 200 to 250 nm/min which is almost consistent. We fabricated nano-pocket membranes with a top wide opening (700 nm) (figure 3). The small openings are on the bottom side (150 to 300 nm) (figure 4). A side view of the membrane shows the top and bottom pores (figure 5).
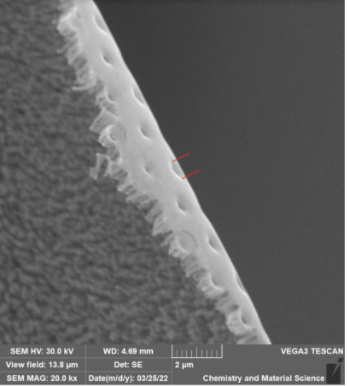
Figure 3 : SEM of fabricated nano-pocket membranes with a wide opening (700 nm) on top
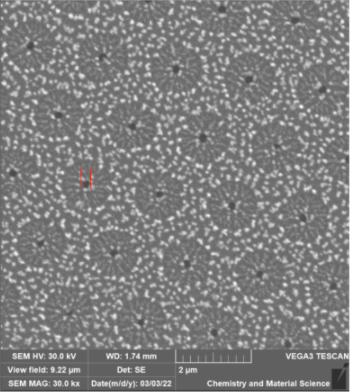
Figure 4 : SEM of fabricated nano-pocket membranes with smaller opening on the bottom side (150 to 300 nm).

Figure 5 : A side view of the membrane shows the upper and lower pores.
Next steps:
1- The fabricated membranes are defective after the etching because the membrane was thin. The hypothesis is to increase the PR thickness to improve the membrane structure. We will increase the PR thickness to be (1.3 and 1.5 um).
2- Validate the membrane: We are going to prove the pores are open by using color (Rhodamine 6G) diffusion from the top to the bottom of the membrane. We will record the diffusion by using the Leica microscope fluorescent mode. The membrane will attached to an acrylic support and landed on top of water. We are going to drop a droplet of dye on top of the membrane. The objective lens will focus on the water to the side of the membrane and have a landscape recording every 15 – 20 min to show the diffusion.